Steve's Buggy Website
Story So Far - Page 1
Visitors So Far:
Yeah Right!
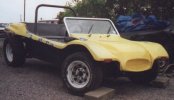
The Buggy in question is a Long Wheelbase Rat Mk1 body based on a 1970 VW Beetle chassis. It has a 1600cc Type 3 engine and front disc brakes.
 |
Here's the story so far
After buying it from a mate, the 'Rat' spent the first couple of months sitting in his driveway (about ten miles away). Eventually, he got so fed up with it still being there, he got a couple of blokes with a recovery vehicle to bring it over to my place (for a small fee). I was so glad to finally get my hands on it.
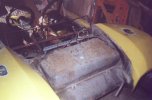
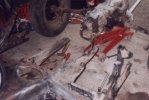
The picture above shows the buggy as it arrived. It was in pretty bad shape. The engine was incomplete and had rather unusual 'modifications' made to it. The clutch operating arm in the gearbox was broken and there was a small lake in each footwell thanks to a very leaky tarpaulin. Oh yeah one of the rear hub assemblies was leaking gearbox oil too. It gets worse!
Although the photo may suggest otherwise, I wasn't completely ripped off as a couple of weeks before the buggy was delivered, my dad and I went over to my mates house and took a whole load of neat junk off the car.
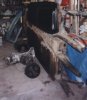
The first thing I did (other than take some pictures) was to clear a gap in the garage big enough to roll the buggy into. Amazingly enough though, that was all I did that day - well I did have GCSE exams to revise for. I did manage to dry the carpet a bit, and I replaced the oversized wheels with thinner type 3 ones so it could fit into the garage.
After my exams, things really started to happen. I ripped the carpet out altogether to find out what it was like underneath...AAAAAAARGH!!!
 |
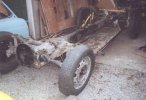 |
Over the space of a few days, I had the car stripped down to a rolling floorpan. I dreamed of a perfectly formed floorpan with little or no rust. But this is what I got - both floorpan halves were covered with 'repair panels' (read as large slabs of metal) which were flimsily welded onto the floorpan. Most were covering holes where the original seat fittings had been removed.
There was a surprisingly small amount of surface rust on the floorpan considering it'd had wet carpet against it for a few months. There were a couple of places on the left floorpan half which had rusted through (They weren't apparent when we bought the car) and there was a large repair done to the battery tray as the original section had almost completely rusted away (a common problem I hear).
After spending a couple of days getting all the thick paint, rust and tar-like stuff off the floorpan, my Dad and I began contemplating new floorpan halves. We decided that restoring the floorpan halves to what I considered an acceptable standard (as in A1 condition) maybe more effort than just replacing the floorpan halves with new ones (the old ones were in quite a state). The only worry we had was whether the replacement panels would be of similar quality and thickness to the original panels.
A couple of weeks later we went to BVF '98 (July-98) at Malvern. I found three places selling replacement floorpan halves made by IGP. I had a look at the panels and gave one a bit of a 'twist' in an attempt to see how strong they were. It was hard to tell, but they seemed quite like the originals. They were certainly thick enough. My Dad asked the bloke on the stall how good they were. He told us that IGP uses VW's old presses to produce identical parts. We were quite convinced that it was what I needed when my Dad noticed something...
Replacement floorpan halves were going to come with seat mounts, jacking points and battery clamping parts, all of which would have to be removed. I knew this from the start. However, if I were to buy quarters, they would have none of these parts and so I wouldn't have to go hacking bits off brand new floorpan sections. A set of quarters did cost a little more than a pair of halves, but we figured the extra expense was probably worth it, so we bought a set. Anyway, the quarters were made by Veng, which makes quality repair panels for almost everything ever made.
 |
Removing the old halves was not difficult. It was just a matter of drilling out the old spot welds. However, there is a fair bit of drilling to do as the spot welds are only spaced about an inch apart, and there are hundreds of them. It can also be quite difficult to find the spot welds, even if you clean them up with a power wire brush. In this case, there was a section about a foot long where I couldn't make them out, so I used a grinder to cut the panel free and then chiseled the remaining strip of metal using the drill to remove them as they came. Even so, it only took me about half an hour to remove one panel. Finally, I used a grinder and power wire brush to clean up the flange and get all the little bits of metal off.
After I finished preparing the flange, I test fitted the replacement panels. The quarters were a perfect fit with the rear quarters only needing minor trimming. My dad and I decided that the best way to go about fitting the new panels was to punch the occasional hole into the edge of each panel and plug weld them into position before seam welding around the bottom edge of the panels.
The ideal solution would be to spot weld the panels, but unfortunately Santa forgot to get me that £50,000 industrial spot welder and huge voltage generator I asked for last Christmas so I suppose I'll have to go without.
 |
 |
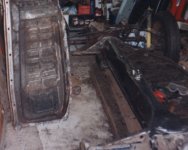
After the plug welding was complete, more dismantling followed. I removed the rear axle and gearbox (with a little help from my Dad - again) so that we could tip the floorpan onto it's side, allowing us to work on the underside. It was at this point I realised we were carrying out a full rebuild, something which you should really decide before you start hacking a car to bits.
Removing the rear axle and gearbox may sound a bit drastic, but it only took about ten minutes. Being a good old beetle chassis, simplicity is the key which in this case means that what holds the rear end to the rest of the car is essentially two MASSIVE bolts. The front end is much the same, but we found no need to remove the front end as this would provide a bit of stability once this huge chunk of metal was flipped on it's side...
Click on 'Next Page' to read about:
If you have any questions, comments or useful information about anything on my website, then why not write me an E-mail. (Click on 'E-mail' below)
Also, where are all the buggy websites? If you know of a good website then please get in touch.
(Last updated Jul-99)